")
Frequently Asked Questions
Οδηγίες σωστής διαχείρισης στα καινούργια παγούρια σιλικόνης ιατρικών εφαρμογών
--SMELL REMOVAL IF ANY: 1. Fill the bottle to 3gr or more green tea and at least 80% of 90o C boiling water close the cap and seal the bottle for 2 hours, discard tea and water. Dry it naturally. Repeat second time if necessary. 2. Periodic cleaning with cleaning tabs helps keep the reservoir and the tube free from taste and odor. Clean regularly for best results. Fill the bottle to water close the cap , seal the bottle for 2 hours, discard water. Dry it naturally.
--Αφαίρεση τυχόν εναπομείναντος μυρωδιάς1. Γεμιστέ το μπουκάλι με 3gr πράσινο τσάι τουλάχιστον και 80% με 90o C βραστού νερού. Σφραγίστε το για 2 ώρες, απορρίψτε το περιεχόμενο και αφήστε το να στεγνώσει. Επαναλάβετε 2η φορά αν χρειάζεται. 2. Περιοδικό πλύσιμο με ταμπλέτες καθαρισμού κρατάνε το παγουρι σας απαλλαγμένο από τις οσμές και την πιθανή γεύση μπουκαλιού. Όσο πιο συχνά τόσο πιο καλά αποτελέσματα. Γεμιστέ το μπουκάλι με νερο και την ταμπλετα, σφραγίστε το για 2 ώρες, απορρίψτε το περιεχόμενο ,αφήστε να στεγνώσει.
Μπορούν να πλυθούν και στο πλυντήριο πιάτων. Μπορούν να πλυθούν και στο πλυντήριο πιάτων Μαλακό Αλλά με Αντοχή Στη Φθορά για ζεστά και για κρύα ροφήματα από -40C ως +147C
-Σιλικόνη - 100% Food Grade Silicone ίδια με εκείνες στις βρεφικές πιπίλες
-Όλα τα μέρη του ταπερ είναι πιστοποιημένα κατά τα πρότυπα FDA/LFGB
-Η σιλικόνη είναι ελεγμένα κατάλληλη για χρήση φαγητού ως και για μεγάλο εύρος ιατρικών εφαρμογών


Fletching Your Arrows
What is Fletching?
Near to the rear of an arrow, there are three feathers or plastic vanes – two of one colour, and the other in a contrasting colour – collectively called the fletching. The purpose of the fletching is stability. When all is going to plan, and the arrow is flying in a perfectly straight line, the fletches will slice through the air without changing the course of the arrow. If, on the other hand, the arrow is wobbling, and its tail is not perfectly following its tip, it will be brought back into line and stabilised, due to friction between the fletching and the air.
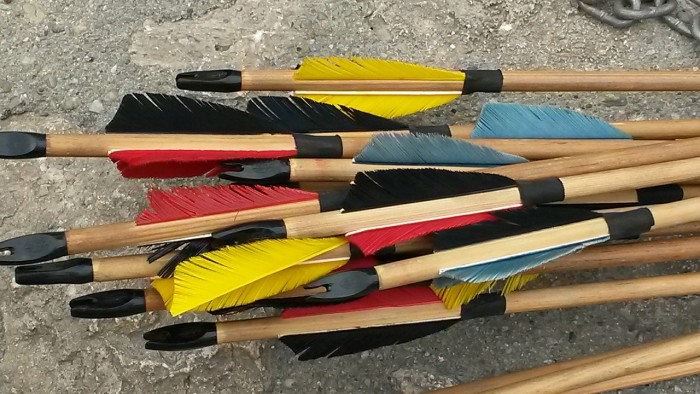
For centuries, fletching was made of feathers – after all, they’re nature’s own design, and they obviously work. Despite enormous leaps forward in technological design, feathers are still contenders in a ‘Who’s best?’ contest. In fact, even the new kid on the block, the compound bow, is sometimes spotted shooting arrows with feather fletching.
Understanding the Structure of a Flight
The rigid structure of interlocking barbs and hooks in a primary flight feather is due to a protein called keratin, which allows the feather to retain its shape when wet. Although the right kind of feather will not be ruined by getting wet, it will, nevertheless, be heavier with the added weight of water. But if you’re set on using feather fletching, you can use a waterproofing powder, designed specifically for this purpose.
The rough, latticed surface of a natural feather is second to none when it comes to creating friction with air, and this is a big attribute when it comes to stabilisation. And despite amazing advancements in the science of synthetic materials, no plastic vane is anywhere near as lightweight as a feather.
If you want to learn more about the things to look for when buying archery items, check out our Buyers Guide to Archery for Newbies, or the Buyers Guide to Archery for Pros.
Feather versus Plastic
However, the most popular choice of fletching for today’s archer is the inexpensive, durable, waterproof plastic vane. Available in a seemingly endless range of colour and size, these soft, flexible vanes can be easily applied in whichever formation you prefer. Even after a fair amount of rough treatment, they’ll pop back into shape; and if they become really warped, you can usually get them back into shape with a bit of heat treatment – a hair drier is the best thing to use.
If you choose plastic vane fletching, you must also make a decision about the angle (or turn) of the fletch on the arrow shaft. Will your priority be speed, or accuracy? Will your choice be restricted by the design of your bow?
A straight fletch is affixed to the shaft in a perfectly straight position, running parallel with the shaft itself. The vane slices through the air, causing minimal friction, and therefore no loss of speed. However, because straight fletching prevents the arrow from spinning, the arrow can become unstable and less able to right itself. This disadvantage becomes more significant the further you have to shoot.
The helical fletch is attached to the arrow’s shaft at an angle, and the fletch itself is also curved, creating maximum wind resistance, and therefore plenty of spin. This spin will help to stabilise your arrow in the same way that a pellet is stabilised by the rifling effect of an airgun. Stability, of course, leads to improved accuracy, but the large amount of friction that causes this fast spin will slow your arrow down.
Which Flies Better – Helical or Straight?
The helical formation is really the only option for feather fletching, as it’s just about impossible to force the naturally curved feather into a straight line. Helical fletching is also ideal for bows of low draw weight. With less speed, there is less stability, so the more spin you can get, the better.
But is there a middle road between the straight and the helical fletch? Yes, there is! It’s the offset fletch.
The offset fletch is straight, but it’s turned at an angle on the arrow shaft. This is an effective solution in cases where the arrow rest doesn’t provide enough clearance for helical fletching to pass through. Contact between the arrow rest and the fletching will compromise speed and stability.
In the case of helical or offset fletching, which way should the arrow spin? The answer is, in general, clockwise – to the right, as you look at the arrow from the nock. It’s all to do with the thread of the tip. When the arrow enters the target counter-clockwise, the tip will unscrew; when it goes in clockwise, it will tighten.
To ensure a clockwise spin, make sure that the upper end of the fletch (the end closest to the tip) is offset to the right as you look down on the arrow from the nock end.
Does Size Matter?
Now, what about size? Does it matter? Well, yes, it does.
When shooting over long distances – 100 meters or more – you’ll do well to use fletches of at least 4” long. The further your arrow travels, the more vulnerable it is to instability. Therefore, every bit of surface area in your fletching will count. Whether you choose to use straight, offset, or helical fletching will depend on other variables in your equipment and environment.
Choosing Your Compound Bow
The energy in the speeding arrow is transferred from the bow, and the energy stored in the bow is transferred from the archer’s body. Even a ‘powerful’ bow won’t do the work by itself!
What is the Right Draw Weight?
A compound bow reaches its peak draw weight before full draw. This is due to the letting-off mechanism, which releases much of the pressure at the final stage of the draw. So, the peak draw weight occurs before the bow is fully drawn.
A compound bow’s draw weight is usually adjustable within a range of 10 or 15lbs and is adjusted by tightening or loosening the bolts that join the limbs to the riser. A bow that’s advertised as having a 60lbs draw weight can be adjusted to a draw weight of anything between 50lbs (or possibly 45lbs) and 60lbs. If you’re new to archery, don’t try to shoot with too great a draw weight to begin with. Start on the low side; upper body strength will soon build up with practice.
This is a generalised guide to appropriate draw weight:
- Children (6-9 years): 10-20 lbs
- Children (9-12 years): 20-35 lbs
- Teenagers and smaller women: 35-45 lbs
- Women: 45-55 lbs
- Men: 55-70 lbs
How to Measure Draw Length
Draw length is the distance between the grip (on the riser) and the centre of the string at full draw. Unlike a traditional bow, a compound bow must be drawn to its maximum capacity, and no further. This means that your compound bow must be the correct draw length for you.
To find out your draw length, use this simple formula:
arm span divided by 2.5
Measure your arm span, which is usually equal to your height, and divide by 2.5. If your arm span is 68”, your draw length will be 28” (68/2.5). If your arm span is 73”, your draw length will be 30” (73/2.5). If your arm span is 60”, your draw length will be 24” (60/2.5) … and so on.
The longer the draw length, the longer the power stroke, which equates to higher arrow velocity. In fact, 1” of draw weight is worth about 10 feet per second (FPS) of arrow speed. A bow’s speed is always tested at 30” draw length. So, if your bow’s speed is advertised as 300 FPS, and your draw length is 25”, you can expect to shoot arrows at a maximum velocity of 250 FPS.
What is the Brace Height?
A bow’s brace height is the distance between the deepest part of the riser to the string (at rest). A shorter brace height means a longer draw stroke, which means more stored energy.
The brace height is related to the overall draw length. If your draw length is 26”, and your bow has a brace height of 6”, the distance over which you’re actually pulling (and storing energy in the bow) is 20”. A fellow archer, who has a draw length of 28” and a bow of 8” brace height, will also be pulling over a distance of 20”.
Because the other chap’s arrow remains in contact with the bow for longer, his arrow will have more stability. If your bow has a brace height of 8”, your pulling distance will be 18”, and your arrows will be more stable … and they’ll be slightly slower.
Choose Wisely
Does speed really matter?
Yes, of course it does, to a point. But don’t let a desire for speed take priority over comfort, accuracy, and safety. Go with your correct draw length. A slight loss of speed is insignificant when compared to the consistent accuracy that can be achieved with a well-suited bow.
Το πρότυπο Oeko-Tex® Standard 100 είναι ένα ανεξάρτητο σύστημα ελέγχου και πιστοποίησης για κλωστοϋφαντουργικά προϊόντα σε ακατέργαστη, ενδιάμεση και τελική μορφή. Παραδείγματα για είδη με δυνατότητα πιστοποίησης: ακατέργαστα και βαμμένα/ εξευγενισμένα υφάσματα και πλεκτά, έτοιμα είδη (ενδύματα όλων των ειδών, κλωστοϋφαντουργικά είδη οικιακής χρήσης, κλινοσκεπάσματα, θηλειωτά υφάσματα, κλωστοϋφαντουργικά είδη παιχνιδιού κ.π.ά.)
Κριτήρια
Οι έλεγχοι επιβλαβών ουσιών περιλαμβάνουν:
1) σύμφωνα με τους νόμους απαγορευμένες ουσίες
2) υποχρεωτικά ελεγχόμενες κατά νόμον ουσίες
3) γνωστές επιβλαβείς για την υγεία ουσίες (για τις οποίες ωστόσο δεν υπάρχει ρύθμιση από νόμο)
4)καθώς και παραμέτρους για προληπτικά υγειονομικά μέτρα
Στο σύνολο τους οι απαιτήσεις υπερβαίνουν σαφώς τις υπάρχουσες εθνικές νομοθεσίες.
Εργαστηριακοί έλεγχοι και κατηγορίες προϊόντων
Οι έλεγχοι επιβλαβών ουσιών της OEKO-TEX® προσανατολίζονται πάντα στην πραγματική χρήση του κλωστοϋφαντουργικού είδους. Όσο πιο έντονη είναι η επαφή ενός προϊόντος με την επιδερμίδα, τόσο πιο αυστηρές απαιτήσεις για την ανθρώπινη οικολογία πρέπει να πληροί.
Αντιστοίχως διαφοροποιούνται τέσσερις κατηγορίες προϊόντων:
Κατηγορία I:
κλωστοϋφαντουργικά είδη για μωρά και μικρά παιδιά έως 3 ετών (ενδυμασία, παιχνίδια, κλινοσκεπάσματα, θηλειωτά υφάσματα κλπ.)
Κατηγορία II:
κλωστοϋφαντουργικά είδη που έρχονται σε επαφή με το δέρμα (εσώρουχα, κλινοσκεπάσματα, κοντομάνικες φανέλες κλπ.)
Κατηγορία III:
κλωστοϋφαντουργικά είδη που δεν έρχονται σε απευθείας επαφή με το δέρμα (σακάκια, παλτά κλπ.)
Κατηγορία IV:
υλικά εξοπλισμών (κουρτίνες, τραπεζομάντιλα, επενδύσεις ταπετσαρισμένων επίπλων κλπ.)
Πιστοποίηση
Προϋπόθεση για την πιστοποίηση κλωστοϋφαντουργικών προϊόντων σύμφωνα με το πρότυπο OEKO-TEX® Standard 100 είναι ότι όλα τα τμήματα ενός είδους ανεξαιρέτως θα πληρούν τα απαιτούμενα κριτήρια, δηλαδή εκτός της υφασμάτινης επικάλυψης για παράδειγμα και οι κλωστές ραφής, τα ενθέματα, οι ετικέτες κλπ. καθώς και τα μη κλωστοϋφαντουργικά αξεσουάρ όπως κουμπιά, φερμουάρ, πρεσαριστά κουμπιά κλπ.

Hipora is a 3 layer membrane that prevents water from coming in while letting moisture out. It has a microporous structure. It is premium fabric with a polyurethane coating, the layers of material have tiny holes in it so water cannot get in, but moisture can.
The first layer will prevent any water from getting in. It has pores less then .5 um in diameter. The opening is so small to prevent the water from entering, but letting moisture out.
The second layer is a honeycomb structure that lets moisture in to let it expel through the first layer. It absorbs the moisture so your body does not get sweaty while letting the moisture slowly leave. This is all at a microscopic and macroscopic levels you will never feel.
The third layer is very dense for added protection against water. This is the layer closest to you and makes sure no water can come in.
All three layers combined create Hipora and that is what we use in most of our gear. We have used the technology on the snow and have always had great success. This technology actually meets O.S.H.A.Bloodborne Pathogens Standard (29CFR 1910.1030). We may not recommend you use it in that environment, but is a testament to its quality.
The R-value of a sleeping mat measures its thermal resistance, or how well it insulates you from the cold ground. The higher the R-value, the better the insulation. Here’s a quick guide to R-values and their corresponding seasonal use12:
R-Value 1-2: Suitable for summer camping (above 10°C or 50°F).
R-Value 2-3: Good for late spring to early fall (around 4°C or 40°F).
R-Value 3-4: Ideal for three-season use, including cooler spring and fall nights (down to -1°C or 30°F).
R-Value 4-5: Suitable for winter camping (down to -7°C or 20°F).
R-Value 5+: Best for extreme cold conditions (below -18°C or 0°F).
What are the properties of aramid fibers? Aramid fiber is a man-made synthetic fiber, known for being heat-resistant and extremely strong. Originally designed for the US military, this is a high-performance material favored for its exceptional strength. It is also incredibly light compared to how tough it is, and each fiber is thinner than a human hair. Its relatively low molecular weight and exceptional toughness mean that aramid fiber is now used for bulletproof vests, airplanes, and even spacecraft. How is aramid fiber different from carbon fiber? There is a lot of confusion between carbon fiber and aramid fiber, but they are not the same material. The confusion is understandable - both are man-made, modern composite materials, widely used because they are so strong and light, and both come from the same family of materials. However, carbon fiber is an electrical conductor while aramid fiber, on the other hand, is not conductive. Additionally, while it is strong and rigid, carbon fiber is also brittle, and not soft enough to bend 360 degrees. Is Aramid Fiber the same as Kevlar®? In a word, yes. Kevlar® is a registered trademark, used for products manufactured by the DuPont company, but it is simply another way of referring to aramid fiber. DuPont uses it to create body armor and bulletproof vests, but when used elsewhere, you will see it referred to by its generic name, aramid fiber. If you are familiar with Kevlar®, you also have a good understanding of the properties of aramid fibers. Aramid fiber gloves protect against heat, are cut resistant, and are hard to tear. High tensile strength while having a high modulus of elasticity. Excellent thermal stability from -70 °C to 200 °C while not sustaining combustion, does not melt. Better fatigue resistance compared to other synthetic fibers.
They are actually sock shoes. We have combined the best of both worlds into one handy entity - the freedom of a sock and the protection of shoes. Simply put, Skinners are a new breed in footwear.
Should I wear Skinners with or without socks?
To maximize your comfort and also ensure a longer-lasting fresh feeling, we recommend combining Skinners with thin cotton socks. However, it depends on your preference, both ways of wearing sock shoes are possible, so you can choose whichever is more comfortable for you.
Skinners sock shoes look fragile. Will they not be destroyed after a while?
No, don't worry. They have been designed to last and be durable. The material from which the sole is made is highly resistant to abrasion. The knit is seamless and does not contain any glues or anything else that could cause them to fall apart. Simply put, there is nothing to break. You can wear them however you want.
How many kilometers do sock shoes last?
We have been wearing the same Skinners model for more than a year and they still hold up perfectly. But it also depends on whether you are a 110 kg guy and use Skinners mainly for road running, or a 50 kg girl, using Skinners as a replacement shoe or just for walking on soft surfaces. We can say with certainty that it is at least 800 km. However, from our experience, we can say that Skinners last longer than some types of running shoes for more than 150 EUR.
What about Skinners and running? What is it like to run barefoot?
If you run in sock shoes, you will really feel like you are running barefoot. You have to concentrate more and gradually train your muscles and tendons to gain strength. However, if you are running on asphalt or other hard surfaces, long distances, or in dangerous environments or on surfaces you would not walk barefoot on yourself, we recommend sticking to classic running shoes.
Can I really wash my Skinners in the washing machine?
Yes, you can. Put your Skinners in a mesh laundry bag and set the washing machine to a gentle cycle (30°C). We recommend turning the Skinners inside out to avoid damaging the fabrics and so you can wash them with your clothes. After washing, let the Skinners dry properly.
I just bought new Skinners and they are perfect, but small black pieces are falling off. Is this okay?
Don't worry! The initial shedding of the bottom layer is caused by excess material. It is a natural process and after a few uses the shedding will stop.
Are the sock shoes suitable for children?
Yes, the Skinners are ideal for children as they support the natural development of their feet and are extremely comfortable thanks to their seamless construction. However, we recommend that you choose the right size.
Can I use the sock shoes in the water? For example, when swimming in the sea or when rafting down a river?
Yes, that's a great idea. Thanks to their material, they dry quickly and are non-slip, which is ideal for activities such as paddleboarding, canoeing or walking on wet surfaces. You can also take them with you on a beach holiday and your feet will be protected from sharp stones or coral.
Είναι κάλτσες ή παπούτσια Skinners;
Είναι στην πραγματικότητα παπούτσια με κάλτσες. Έχουμε συνδυάσει τα καλύτερα και των δύο κόσμων σε ένα πρακτικό σύνολο - την ελευθερία μιας κάλτσας και την προστασία των παπουτσιών. Με απλά λόγια, τα Skinners είναι μια νέα γενιά στα υποδήματα.
Πρέπει να φοράω Skinners με ή χωρίς κάλτσες;
Για να μεγιστοποιήσετε την άνεσή σας και να εξασφαλίσετε μια αίσθηση φρεσκάδας που διαρκεί, συνιστούμε να συνδυάσετε τα Skinners με λεπτές βαμβακερές κάλτσες. Ωστόσο, εξαρτάται από την προτίμησή σας, και οι δύο τρόποι χρήσης των παπουτσιών με κάλτσες είναι δυνατοί, οπότε μπορείτε να επιλέξετε όποιον σας βολεύει περισσότερο.
Τα παπούτσια με κάλτσες Skinners φαίνονται εύθραυστα. Δεν θα καταστραφούν μετά από λίγο καιρό;
Όχι, μην ανησυχείτε. Έχουν σχεδιαστεί για να διαρκούν και να είναι ανθεκτικά. Το υλικό από το οποίο είναι κατασκευασμένη η σόλα είναι εξαιρετικά ανθεκτικό στην τριβή. Το πλεκτό είναι χωρίς ραφές και δεν περιέχει κόλλες ή οτιδήποτε άλλο που θα μπορούσε να τα κάνει να διαλύονται. Με απλά λόγια, δεν υπάρχει τίποτα που να σπάσει. Μπορείτε να τα φορέσετε όπως θέλετε.
Πόσα χιλιόμετρα διαρκούν τα παπούτσια με κάλτσες;
Φοράμε το ίδιο μοντέλο Skinners για περισσότερο από ένα χρόνο και εξακολουθούν να αντέχουν τέλεια. Αλλά εξαρτάται επίσης από το αν είστε ένας άντρας 110 κιλών και χρησιμοποιείτε τα Skinners κυρίως για τρέξιμο δρόμου, ή ένα κορίτσι 50 κιλών, που χρησιμοποιεί τα Skinners ως παπούτσι αντικατάστασης ή απλώς για περπάτημα σε μαλακές επιφάνειες. Μπορούμε να πούμε με βεβαιότητα ότι είναι τουλάχιστον 800 χλμ. Ωστόσο, από την εμπειρία μας, μπορούμε να πούμε ότι τα Skinners διαρκούν περισσότερο από ορισμένους τύπους παπουτσιών τρεξίματος για περισσότερα από 150 ευρώ.
Τι γίνεται με τα Skinners και το τρέξιμο; Πώς είναι να τρέχεις ξυπόλητος;
Αν τρέχετε με κάλτσες, θα νιώθετε πραγματικά σαν να τρέχετε ξυπόλητος. Πρέπει να συγκεντρωθείτε περισσότερο και να γυμνάσετε σταδιακά τους μύες και τους τένοντές σας για να αποκτήσετε δύναμη. Ωστόσο, αν τρέχετε σε άσφαλτο ή άλλες σκληρές επιφάνειες, μεγάλες αποστάσεις ή σε επικίνδυνα περιβάλλοντα ή σε επιφάνειες στις οποίες δεν θα περπατούσατε ξυπόλητοι μόνοι σας, σας συνιστούμε να επιλέγετε κλασικά παπούτσια τρεξίματος.
Μπορώ πραγματικά να πλύνω τα Skinners μου στο πλυντήριο;
Ναι, μπορείτε. Βάλτε τα Skinners σας σε μια πλαστική σακούλα πλυντηρίου και ρυθμίστε το πλυντήριο σε έναν απαλό κύκλο (30°C). Συνιστούμε να γυρίσετε τα Skinners από την ανάποδη για να μην καταστρέψετε τα υφάσματα και για να μπορείτε να τα πλύνετε με τα ρούχα σας. Μετά το πλύσιμο, αφήστε τα Skinners να στεγνώσουν σωστά.
Μόλις αγόρασα καινούργια Skinners και είναι τέλεια, αλλά πέφτουν μικρά μαύρα κομμάτια. Είναι εντάξει;
Μην ανησυχείτε! Η αρχική αποβολή του κάτω στρώματος προκαλείται από την περίσσεια υλικού. Είναι μια φυσική διαδικασία και μετά από μερικές χρήσεις η αποβολή θα σταματήσει.
Είναι τα κάλτσες κατάλληλες για παιδιά;
Ναι, τα Skinners είναι ιδανικά για παιδιά, καθώς υποστηρίζουν τη φυσική ανάπτυξη των ποδιών τους και είναι εξαιρετικά άνετα χάρη στην απρόσκοπτη κατασκευή τους. Ωστόσο, σας συνιστούμε να επιλέξετε το σωστό μέγεθος.
Μπορώ να χρησιμοποιήσω τα κάλτσες στο νερό; Για παράδειγμα, όταν κολυμπάω στη θάλασσα ή όταν κάνω ράφτινγκ σε ένα ποτάμι;
Ναι, αυτή είναι μια εξαιρετική ιδέα. Χάρη στο υλικό τους, στεγνώνουν γρήγορα και είναι αντιολισθητικά, κάτι που είναι ιδανικό για δραστηριότητες όπως paddleboarding, κανό ή περπάτημα σε βρεγμένες επιφάνειες. Μπορείτε επίσης να τα πάρετε μαζί σας σε διακοπές στην παραλία και τα πόδια σας θα προστατεύονται από αιχμηρές πέτρες ή κοράλλια.
The marking II 2 G Ex ib IIC T4 Gb is a standardized ATEX/IECEx designation applied to electrical equipment intended for use in explosive atmospheres. Each component of the marking communicates a specific safety characteristic. When taken together, they justify that the equipment is suitable for gas‑hazard zones, high‑risk industrial environments, and applications requiring intrinsic safety. When all elements are combined, II 2 G Ex ib IIC T4 Gb describes equipment that:
- is intended for industrial gas environments (Group II, G)
- can be installed in Zone 1 (Category 2, EPL Gb)
- uses intrinsic safety as its protection method (Ex ib)
- is safe even in the presence of high‑risk gases (IIC)
- maintains a safe surface temperature (T4)
- Equipment Group II covers non‑mining industries, meaning the equipment is intended for use in environments where explosive atmospheres may be present due to gases, vapors, or mists.Most industrial sectors—petrochemical plants, refineries, fuel storage depots, paint shops, chemical processing facilities—fall under Group II.
- Category 2 equipment is designed for Zone 1, where explosive atmospheres are likely to occur during normal operation.This is essential for equipment installed in areas with frequent gas presence, such as pump rooms, compressor stations, and solvent handling areas.
- The “G” indicates suitability for gas explosive atmospheres.Gas hazards require stricter ignition control than dust hazards due to lower minimum ignition energies. Equipment marked “G” is specifically tested for gas‑phase ignition risks, making it appropriate for environments containing flammable vapors (e.g., propane, hydrogen, acetylene).
- Protection Concept: Ex ib
“Ex ib” refers to intrinsic safety, level “ib”. Intrinsic safety is a protection method that limits electrical energy such that ignition of an explosive atmosphere is prevented even under fault conditions.
- Ex ib is suitable for Zone 1, aligning with Category 2.It ensures that even if two faults occur, the energy available in the circuit remains below the ignition threshold of the surrounding gas.
- Intrinsic safety is ideal for low‑power devices such as sensors, transmitters, communication modules, and portable instruments.It eliminates the need for heavy explosion‑proof enclosures, reducing weight and cost while maintaining safety.
- Gas Group: IIC
Gas Group IIC is the highest gas group, covering the most easily ignitable gases such as hydrogen and acetylene.
This ensures the equipment can be safely deployed in high‑risk chemical plants, hydrogen facilities, and environments with highly volatile gases.
- minimal permissible gaps
- strict control of energy levels
- enhanced creepage and clearance distances
- Temperature Class: T4
T4 indicates a maximum surface temperature of 135°C under fault conditions.
Many flammable gases have auto‑ignition temperatures above 135°C, making T4 a widely accepted class for industrial gas environments.
- electronics with power dissipation
- equipment installed near heat sources
- devices operating continuously in warm climates (e.g., Mediterranean industrial sites)
- Equipment Protection Level: Gb
“Gb” corresponds to high protection level for gas atmospheres, suitable for Zone 1.It aligns with:
- Category 2
- Ex ib
- Zone 1 installation requirements
This guarantees a consistent safety level across all certification frameworks (ATEX and IECEx).
Η σήμανση II 2 G Ex ib IIC T4 Gb είναι μια τυποποιημένη ονομασία ATEX/IECEx που εφαρμόζεται σε ηλεκτρικό εξοπλισμό που προορίζεται για χρήση σε εκρηκτικές ατμόσφαιρες. Κάθε στοιχείο της σήμανσης επικοινωνεί ένα συγκεκριμένο χαρακτηριστικό ασφαλείας. Όταν λαμβάνονται μαζί, δικαιολογούν ότι ο εξοπλισμός είναι κατάλληλος για ζώνες κινδύνου αερίου, βιομηχανικά περιβάλλοντα υψηλού κινδύνου και εφαρμογές που απαιτούν εγγενή ασφάλεια. Όταν όλα τα στοιχεία συνδυάζονται, το II 2 G Ex ib IIC T4 Gb περιγράφει εξοπλισμό που:
- προορίζεται για βιομηχανικά περιβάλλοντα αερίου (Ομάδα II, G)
- μπορεί να εγκατασταθεί στη Ζώνη 1 (Κατηγορία 2, EPL Gb)
- χρησιμοποιεί την εγγενή ασφάλεια ως μέθοδο προστασίας (Ex ib)
- είναι ασφαλής ακόμη και παρουσία αερίων υψηλού κινδύνου (IIC)
- διατηρεί μια ασφαλή θερμοκρασία επιφάνειας (T4)
- Η Ομάδα Εξοπλισμού II καλύπτει τις μη εξορυκτικές βιομηχανίες, που σημαίνει ότι ο εξοπλισμός προορίζεται για χρήση σε περιβάλλοντα όπου ενδέχεται να υπάρχουν εκρηκτικές ατμόσφαιρες λόγω αερίων, ατμών ή ομίχλης. Οι περισσότεροι βιομηχανικοί τομείς - πετροχημικά εργοστάσια, διυλιστήρια, αποθήκες αποθήκευσης καυσίμων, βαφεία, εγκαταστάσεις χημικής επεξεργασίας - εμπίπτουν στην Ομάδα II.
- Ο εξοπλισμός κατηγορίας 2 έχει σχεδιαστεί για τη Ζώνη 1, όπου είναι πιθανό να δημιουργηθούν εκρηκτικές ατμόσφαιρες κατά την κανονική λειτουργία. Αυτό είναι απαραίτητο για εξοπλισμό που εγκαθίσταται σε περιοχές με συχνή παρουσία αερίου, όπως αντλιοστάσια, σταθμούς συμπιεστών και χώρους χειρισμού διαλυτών.
- Το "G" υποδεικνύει καταλληλότητα για εκρηκτικές ατμόσφαιρες αερίου. Οι κίνδυνοι αερίου απαιτούν αυστηρότερο έλεγχο ανάφλεξης από τους κινδύνους σκόνης λόγω χαμηλότερων ελάχιστων ενεργειών ανάφλεξης. Ο εξοπλισμός με την ένδειξη "G" δοκιμάζεται ειδικά για κινδύνους ανάφλεξης σε αέρια φάση, καθιστώντας τον κατάλληλο για περιβάλλοντα που περιέχουν εύφλεκτους ατμούς (π.χ. προπάνιο, υδρογόνο, ακετυλένιο).
- Έννοια Προστασίας: Ex ib
Το "Ex ib" αναφέρεται στην εγγενή ασφάλεια, επίπεδο "ib". Η εγγενής ασφάλεια είναι μια μέθοδος προστασίας που περιορίζει την ηλεκτρική ενέργεια έτσι ώστε να αποτρέπεται η ανάφλεξη μιας εκρηκτικής ατμόσφαιρας ακόμη και υπό συνθήκες σφάλματος.
- Το Ex ib είναι κατάλληλο για τη Ζώνη 1, ευθυγραμμιζόμενο με την Κατηγορία 2. Εξασφαλίζει ότι ακόμη και αν προκύψουν δύο σφάλματα, η ενέργεια που διατίθεται στο κύκλωμα παραμένει κάτω από το όριο ανάφλεξης του περιβάλλοντος αερίου.
- Η εγγενής ασφάλεια είναι ιδανική για συσκευές χαμηλής ισχύος, όπως αισθητήρες, πομπούς, μονάδες επικοινωνίας και φορητά όργανα. Εξαλείφει την ανάγκη για βαριά περιβλήματα ανθεκτικά στις εκρήξεις, μειώνοντας το βάρος και το κόστος, διατηρώντας παράλληλα την ασφάλεια.
- Ομάδα Αερίων: IIC
Η Ομάδα Αερίων IIC είναι η υψηλότερη ομάδα αερίων, καλύπτοντας τα πιο εύκολα αναφλέξιμα αέρια, όπως το υδρογόνο και η ακετυλίνη.
Αυτό διασφαλίζει ότι ο εξοπλισμός μπορεί να αναπτυχθεί με ασφάλεια σε χημικά εργοστάσια υψηλού κινδύνου, εγκαταστάσεις υδρογόνου και περιβάλλοντα με εξαιρετικά πτητικά αέρια.
- ελάχιστα επιτρεπόμενα κενά
- αυστηρός έλεγχος των επιπέδων ενέργειας
- βελτιωμένες αποστάσεις ερπυσμού και απόστασης
- Κλάση Θερμοκρασίας: T4
Η T4 υποδεικνύει μέγιστη θερμοκρασία επιφάνειας 135°C υπό συνθήκες σφάλματος.
Πολλά εύφλεκτα αέρια έχουν θερμοκρασίες αυτόματης ανάφλεξης άνω των 135°C, καθιστώντας την T4 μια ευρέως αποδεκτή κατηγορία για βιομηχανικά περιβάλλοντα αερίων.
- ηλεκτρονικά με απαγωγή ισχύος
- εξοπλισμός εγκατεστημένος κοντά σε πηγές θερμότητας
- συσκευές που λειτουργούν συνεχώς σε θερμά κλίματα (π.χ., μεσογειακές βιομηχανικές εγκαταστάσεις)
- Επίπεδο προστασίας εξοπλισμού: Gb
Το «Gb» αντιστοιχεί σε υψηλό επίπεδο προστασίας για ατμόσφαιρες αερίου, κατάλληλο για τη Ζώνη 1. Συμμορφώνεται με:
- Κατηγορία 2
- Ex ib
- Απαιτήσεις εγκατάστασης Ζώνης 1
Αυτό εγγυάται ένα συνεπές επίπεδο ασφάλειας σε όλα τα πλαίσια πιστοποίησης (ATEX και IECEx).